杨培文

Yang Peiwen

V4L2全称是Video for Linux 2,通过它可以驱动摄像头。

在Ubuntu中,已经内置了V4L2,因此不需要安装多余的东西。在WRTnode中,如果你需要使用V4L2,需要这样:

1
Libraries  --->    libv4l

然后直接上代码:

1
2
3
4
5
6
7
8
9
10
11
12
13
14
15
16
17
18
19
20
21
22
23
24
25
26
27
28
29
30
31
32
33
34
35
36
37
38
39
40
41
42
43
44
45
46
47
48
49
50
51
52
53
#include <stdio.h>
#include <fcntl.h>
#include <linux/videodev2.h>

char videodevice[] = "/dev/video0";
void printFrameInterval(int fd, unsigned int fmt, unsigned int width, unsigned int height)
{
struct v4l2_frmivalenum frmival;
memset(&frmival,0,sizeof(frmival));
frmival.pixel_format = fmt;
frmival.width = width;
frmival.height = height;
while (ioctl(fd, VIDIOC_ENUM_FRAMEINTERVALS, &frmival) == 0)
{
if (frmival.type == V4L2_FRMIVAL_TYPE_DISCRETE)
printf("[%dx%d] %f fps\n", width, height, 1.0*frmival.discrete.denominator/frmival.discrete.numerator);
else
printf("[%dx%d] [%f,%f] fps\n", width, height, 1.0*frmival.stepwise.max.denominator/frmival.stepwise.max.numerator, 1.0*frmival.stepwise.min.denominator/frmival.stepwise.min.numerator);
frmival.index++;
}
}
int main()
{
//打开摄像头设备
int fd = -1;
fd = open (videodevice, O_RDWR, 0);
if(fd<0){
printf("failed to open\n");
return -1;
}
printf("打开摄像头设备成功,%s\n", videodevice);

//查询摄像头信息,VIDIOC_QUERYCAP
printf("------------\n");
struct v4l2_capability cap;
ioctl (fd, VIDIOC_QUERYCAP, &cap);
printf("Driver Name:%s\nCard Name:%s\nBus info:%s\nDriver Version:%u.%u.%u\n\n",cap.driver,cap.card,cap.bus_info,(cap.version>>16)&0XFF, (cap.version>>8)&0XFF,cap.version&0XFF);

//查询摄像头视频格式,VIDIOC_ENUM_FMT
printf("------------\n");
struct v4l2_fmtdesc fmtdesc;
fmtdesc.index=0;
fmtdesc.type=V4L2_BUF_TYPE_VIDEO_CAPTURE;
printf("Supportformat:\n");
while(ioctl(fd,VIDIOC_ENUM_FMT,&fmtdesc)!=-1)
{
printf("\t%d.%c%c%c%c\t%s\n",fmtdesc.index+1,fmtdesc.pixelformat & 0xFF, (fmtdesc.pixelformat >> 8) & 0xFF,(fmtdesc.pixelformat >> 16) & 0xFF, (fmtdesc.pixelformat >> 24) & 0xFF,fmtdesc.description);
fmtdesc.index++;
}

v4l2_close(fd);
return 0;
}
1
2
gcc test.c -o test -lv4l2
./test

这里我获取了三个摄像头的信息。

首先当然是下载OpenCV的源码,我这里的OpenCV版本是2.4.11。下载地址:http://opencv.org/downloads.html(87.4MB)。

下载好之后解压,然后安装cmake,并打开cmake-gui开始配置交叉编译。

1
2
sudo apt-get install cmake cmake-qt-gui
cmake-gui

选好源码的目录,这里我在桌面上创建了一个目录叫opencv-mipsel,用来存放编译好的文件。

设置好之后点击Configure。

选择最后一个选项(交叉编译)。

在Operating System填上Linux,然后c和c++编译器选择/home/ypw/Desktop/wrtnode/staging_dir/toolchain-mipsel_24kec+dsp_gcc-4.8-linaro_uClibc-0.9.33.2/bin/mipsel-openwrt-linux-gcc 这个编译器和``` /home/ypw/Desktop/wrtnode/staging_dir/toolchain-mipsel_24kec+dsp_gcc-4.8-linaro_uClibc-0.9.33.2/bin/mipsel-openwrt-linux-g++

1
2
3
4
5
6
7
8
9
10
11
12
13
14
15
16
17
18
19
20
21
22

Target Root就是```
/home/ypw/Desktop/wrtnode/staging_dir/toolchain-mipsel_24kec+dsp_gcc-4.8-linaro_uClibc-0.9.33.2/bin
``` 目录。Finish之后会看到很多选项。

[![](/images/Snip20151020_63.png)](/images/Snip20151020_63.png)

首先我们应该去掉**WITH_GTK**,**WITH_FFMPEG**,因为它们无法编译成功。(此处参考[opencv-2.4.4的交叉编译](http://wiki.wrtnode.com/index.php?title=Common_method/zh-cn "Common_method/zh-cn"),事实上我勾上以后并不会编译GTK和FFMPEG,也就是说能编译成功)

[![](/images/Snip20151020_66.png)](/images/Snip20151020_66.png)

然后还有**CMAKE_INSTALL_PREFIX**目录需要设置一下,这里我们选择了```
/usr/local/openwrt
``` 。

[![](/images/Snip20151020_69.png)](/images/Snip20151020_69.png)

最后点击Generate,然后进入openwrt-mipsel文件夹,输入make -j8开始编译。

```sh
cd /home/ypw/Desktop/opencv-mipsel
make -j8

编译过程中我出现过virtual memory exhausted: Cannot allocate memory错误,建议将虚拟机内存扩大到4GB以上。

编译过程中会看到各种花花绿绿的信息输出,不出意外的话大概需要编译十分钟。

完成以后我们就可以安装刚编译好的库了。

1
sudo make install

除此之外还需要将库和头文件复制到toolchain中。

1
sudo cp -r /usr/local/openwrt/* /home/ypw/Desktop/wrtnode/staging_dir/toolchain-mipsel_24kec+dsp_gcc-4.8-linaro_uClibc-0.9.33.2

然后我们就可以开始写我们的OpenCV程序了。参考Reading and Writing Images and Video

1
2
3
4
5
6
7
8
9
10
11
12
13
14
15
16
17
18
19
20
21
22
23
24
25
26
#include <opencv2/core/core.hpp>
#include <opencv2/highgui/highgui.hpp>
#include <cstdio>

using namespace cv;

int main()
{
VideoCapture cap(0); // open the default camera
if(!cap.isOpened()) // check if we succeeded
return -1;

Mat frame;
int i = 0;
char filename[10];
while(i<5)
{
i++;
cap.read(frame);
sprintf(filename, "img%d.jpg", i);
imwrite(filename, frame);
printf("frame:%d\n", i);
}

return 0;
}

编译并上传到/root目录下:

1
2
mipsel-openwrt-linux-g++ test.cpp -o test -lopencv_core -lopencv_highgui
scp test root@192.168.8.1:/root

如果你还没有给交叉编译器创建软链接,现在可以创建一个:

1
sudo ln -s /home/ypw/Desktop/wrtnode/staging_dir/toolchain-mipsel_24kec+dsp_gcc-4.8-linaro_uClibc-0.9.33.2/bin/mipsel-openwrt-linux-g++ /usr/local/bin

此外,我们还需要在WRTnode上安装OpenCV,不然会提示缺少库,就像这样:

1
./test: can't load library 'libopencv_highgui.so.2.4'

所以解决方法是:

1
 Libraries  --->  opencv

开启opencv的编译,然后修改Makefile文件,开启highgui。为什么要开启highgui呢?因为要用VideoCapture就必须``` #include <opencv2/highgui/highgui.hpp>

1
2
3

```sh
/home/ypw/Desktop/wrtnode/feeds/packages/libs/opencv/Makefile

-DBUILD_opencv_highgui:BOOL=ON

然后make -j8,如果以前编译过了OpenCV,最好先``` make clean

1
2
3
4
5
6
7

[![](/images/Snip20151021_78.png)](/images/Snip20151021_78.png)

刷好新的固件之后,我们就可以在WRTnode上运行这个程序了。当然,刷完系统以后需要重新scp一下。

```sh
scp test root@192.168.8.1:/root

当然,运行test之前,USB电流问题也是需要解决的:

1
2
3
ssh root@192.168.8.1
echo 1 > /sys/bus/usb/devices/1-1.3/bConfigurationValue
./test

我们可以看到,拍好了五张图片,每张大小在100kb左右。

在Ubuntu中安装opencv的方法是这样的:

1
sudo apt-get install libopencv-dev

编译: 安装好之后可以直接用g++编译,在本机运行即可测试是否满足我们的需求。只要不含imshow之类的函数,一般可以直接移植到WRTnode 中运行。一般情况下我们会现在ubuntu里写好程序,再放到WRTnode中。

1
g++ test.cpp -o test -lopencv_core -lopencv_highgui

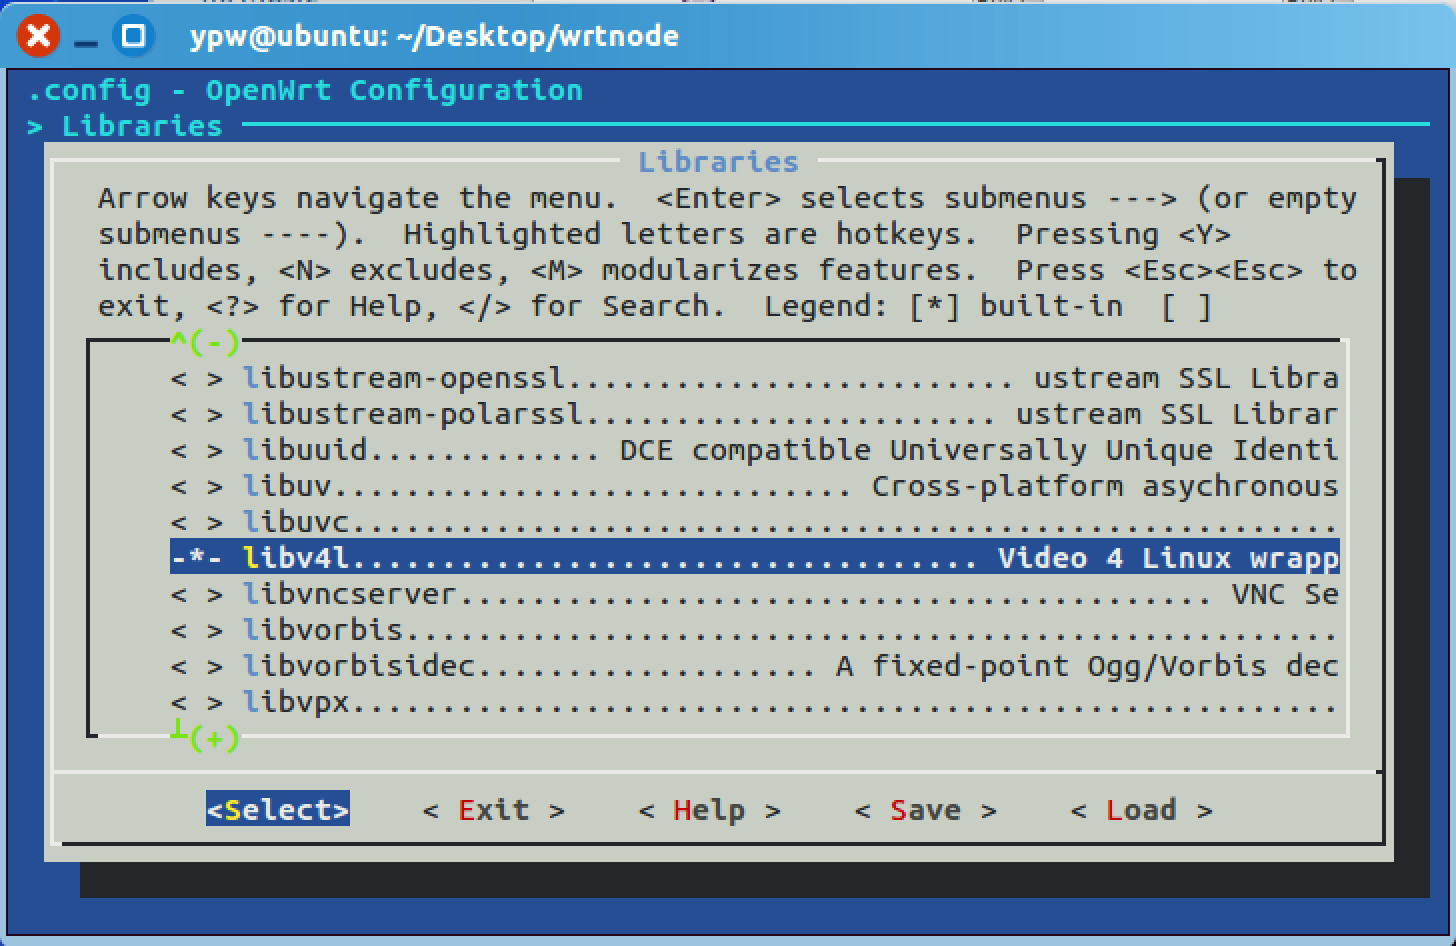
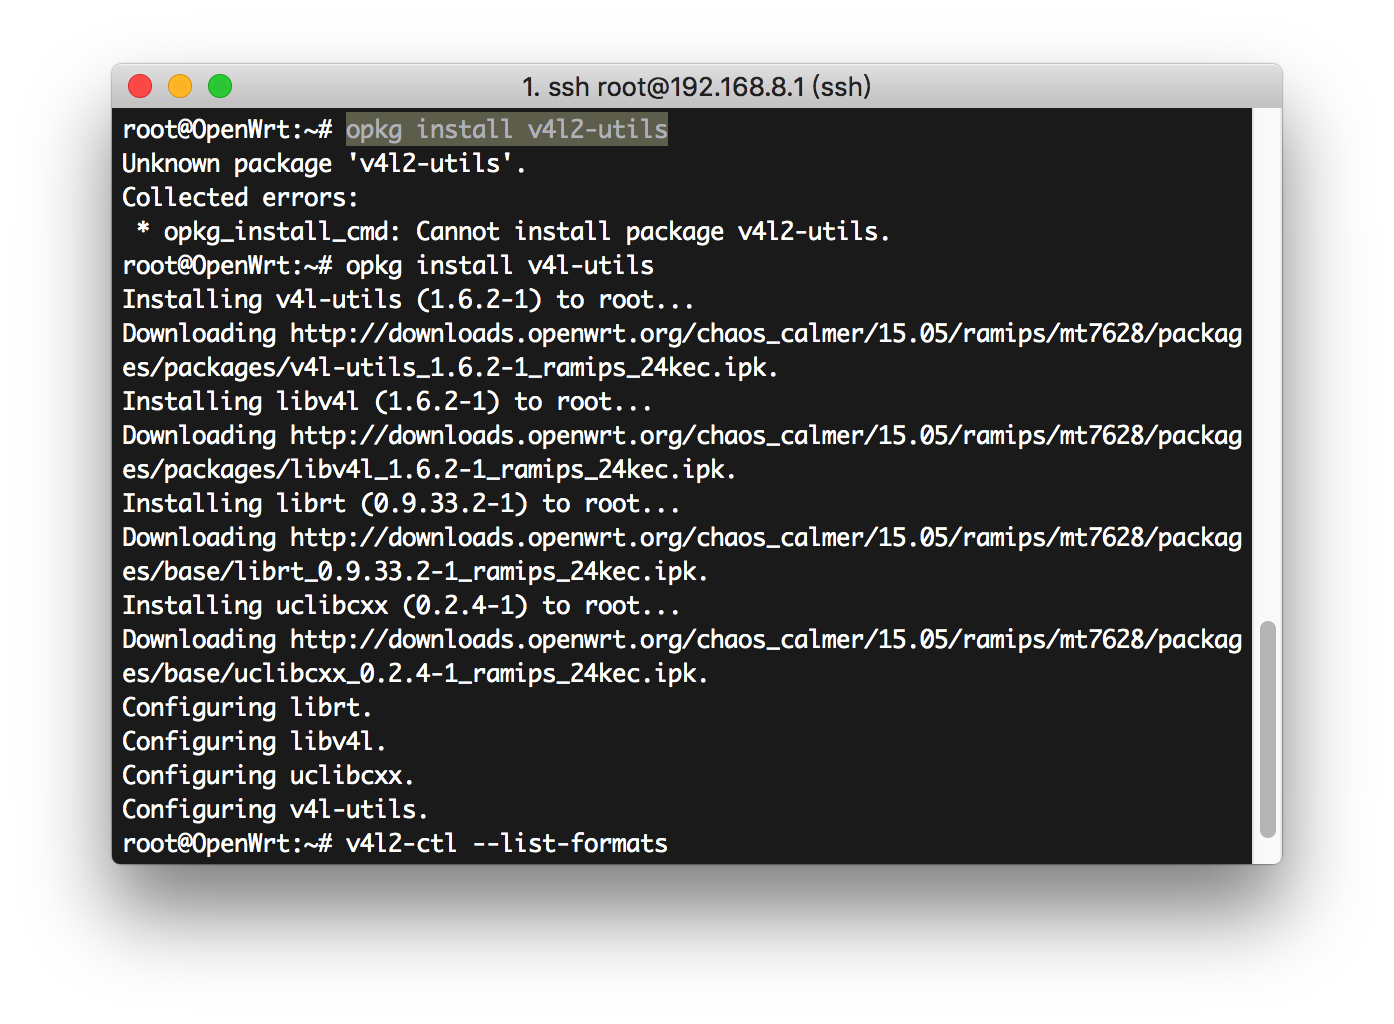
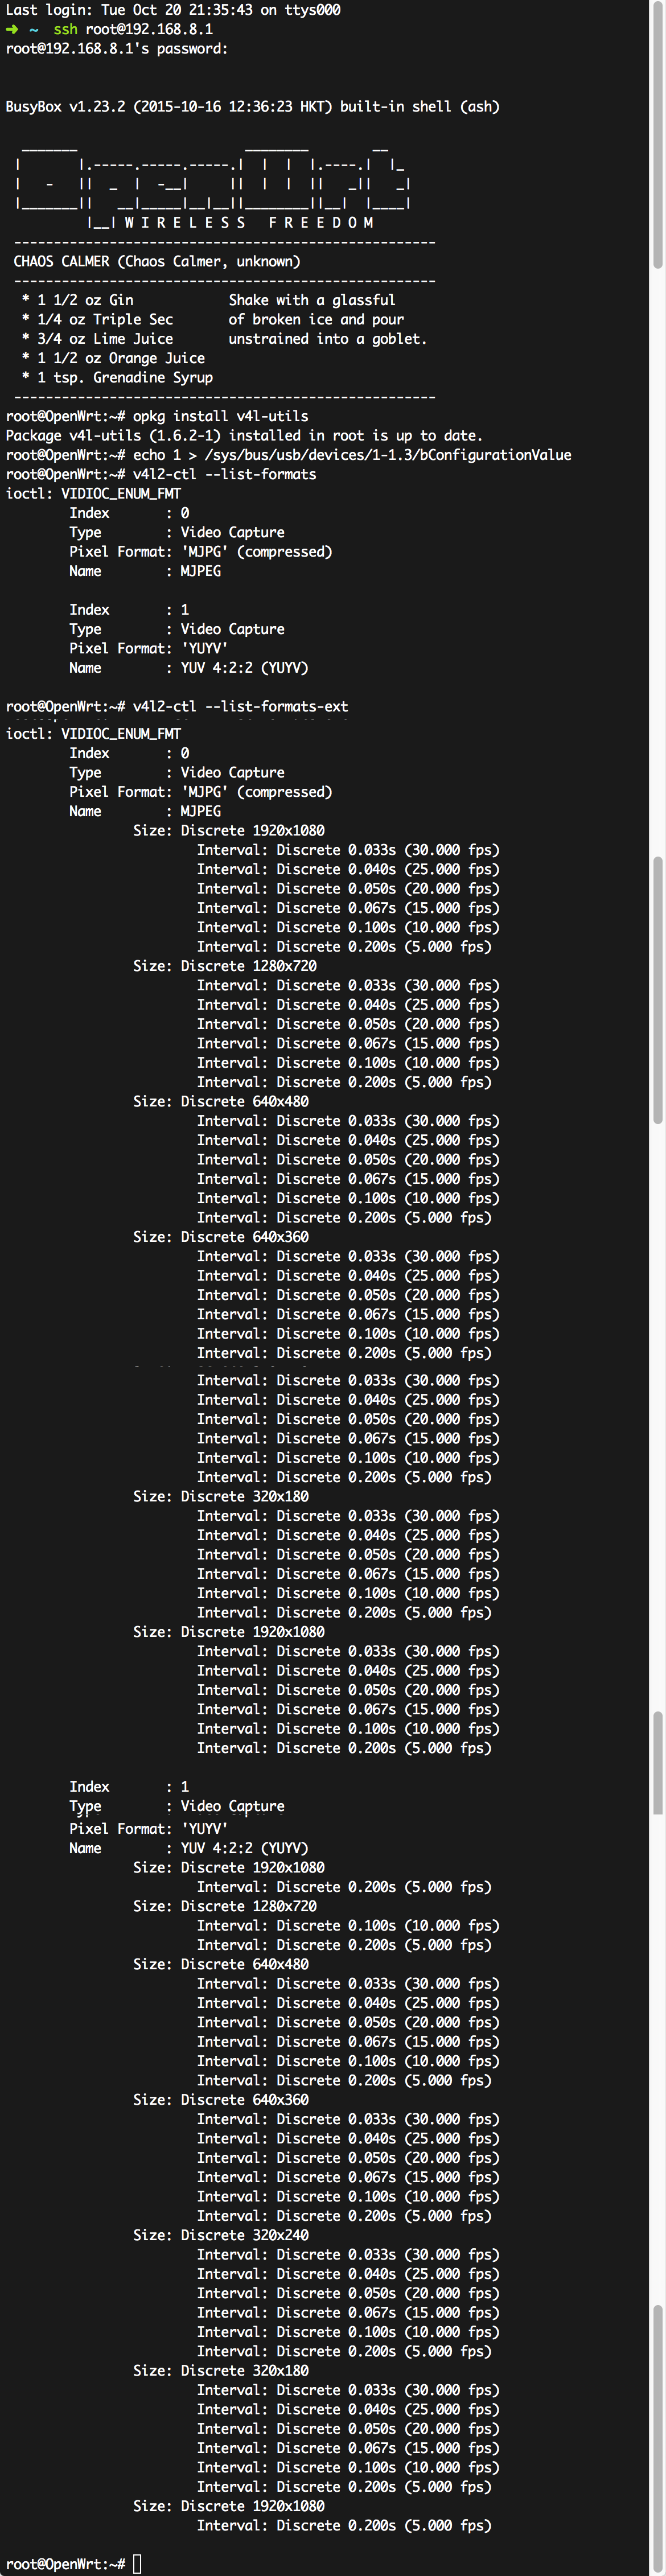
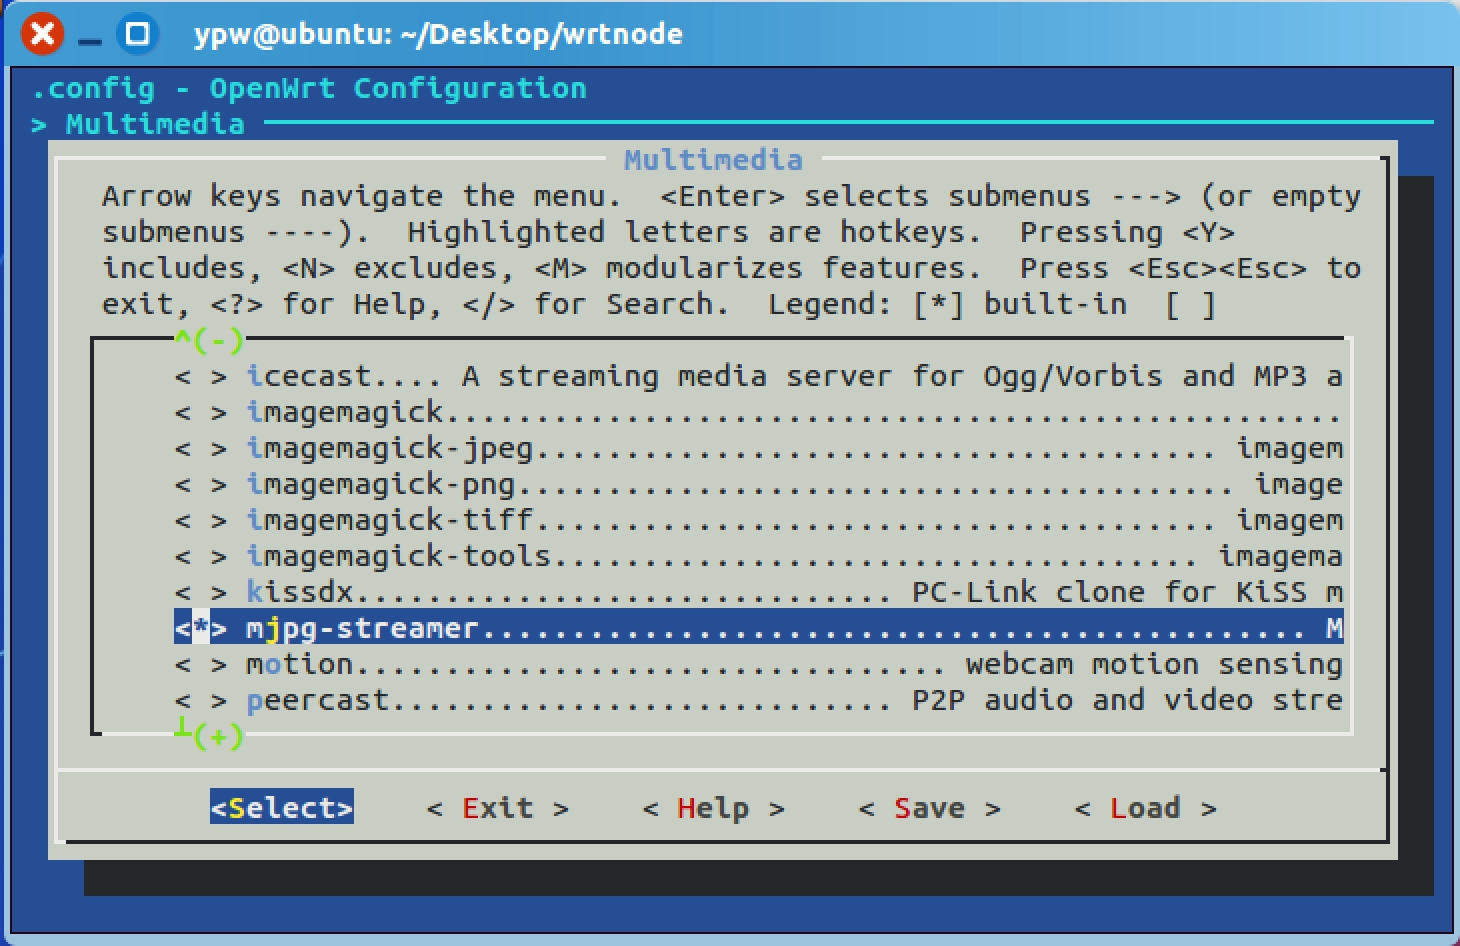
首先安装v4l-utils。 > libv4l is a collection of libraries which adds a thin abstraction layer on top of video4linux2 devices. The purpose of this (thin) layer is to make it easy for application writers to support a wide variety of devices without having to write separate code for different devices in the same class. libv4l consists of 3 different libraries: libv4lconvert, libv4l1 and libv4l2. libv4l1 offers the (deprecated) v4l1 API on top of v4l2 devices, independent of the drivers for those devices supporting v4l1 compatibility (which many v4l2 drivers do not). libv4l2 offers the v4l2 API on top of v4l2 devices, while adding for the application transparent libv4lconvert conversion where necessary. This package contains the video4linux utilities.
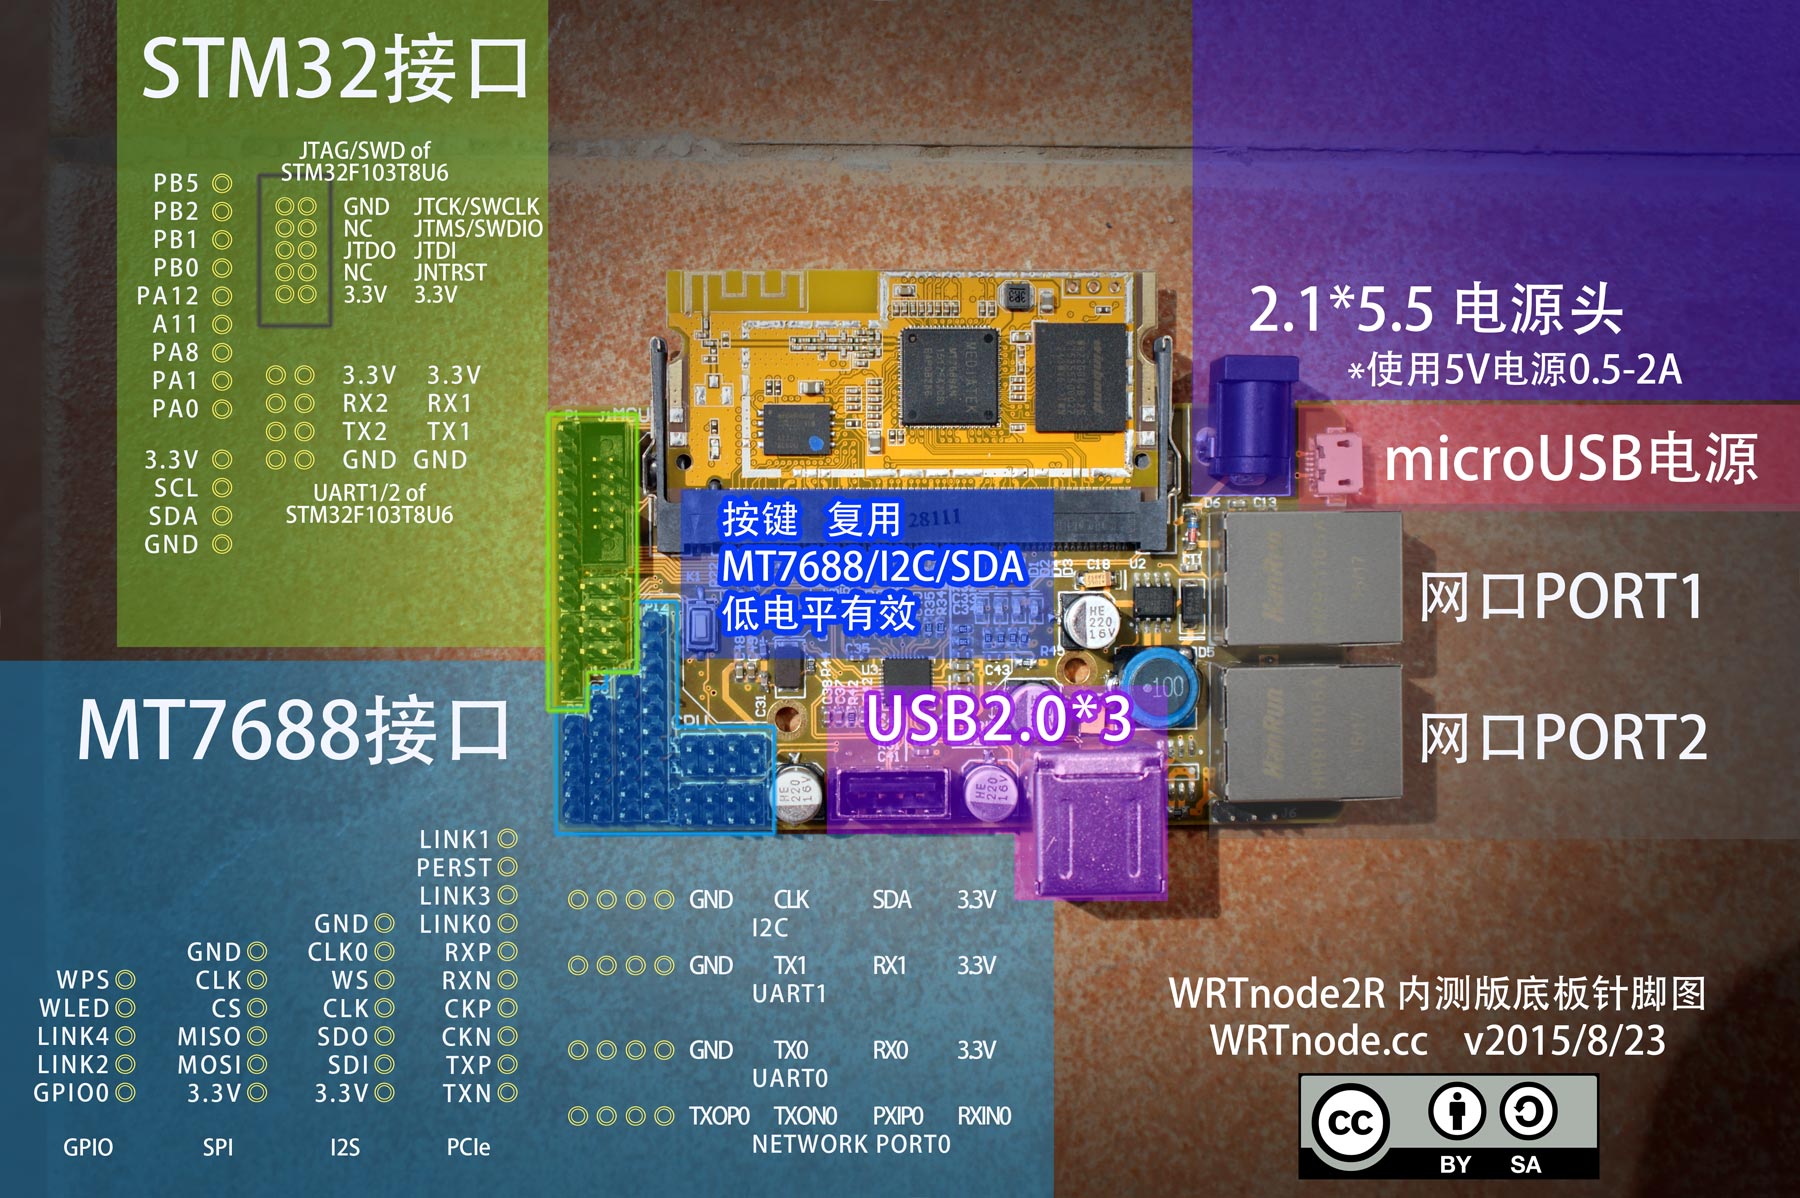
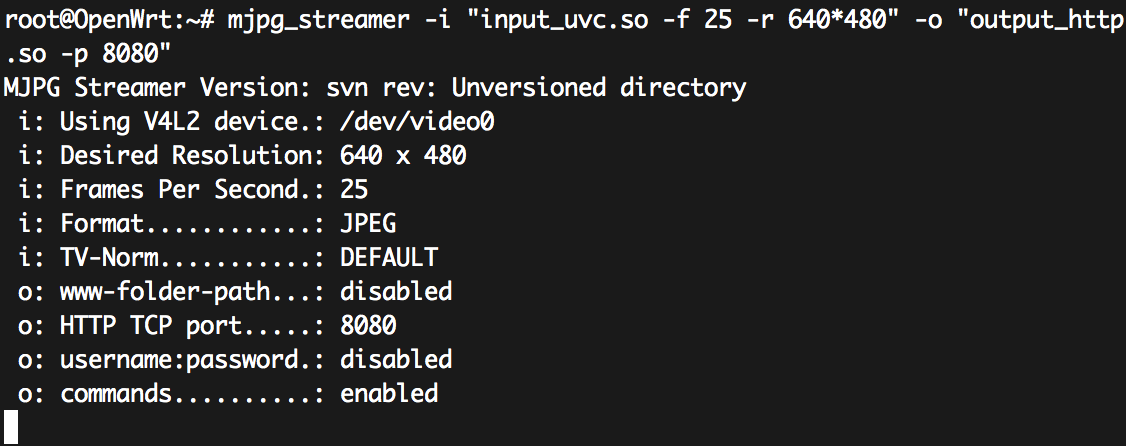
 方法1:

方法2:

1
2
opkg update
opkg install v4l-utils

安装完成之后,我们插上摄像头,然后强制启用。不明白的话可以看WRTnode 2R 使用USB摄像头传输视频流中对USB设备的解释。

1
echo 1 > /sys/bus/usb/devices/1-1.3/bConfigurationValue

启用以后我们来使用v4l-ctl来查看摄像头输出的格式和分辨率。

1
2
v4l2-ctl --list-formats
v4l2-ctl --list-formats-ext

可以看到我这里有两个video设备,一个是MJPG的,一个是YUV的。分辨率也从320*180到1920*1080不等。

首先我们需要对固件重新编译,因为没有USB摄像头驱动是无法进行下一步的传输的。

1
make menuconfig
1
2
3
4
5
Multimedia      --->   <*> mjpg-streamer

Kernel modules ---> Video Support ---> <*> kmod-video-core......
<*> kmod-video-uvc....
-*- kmod-video-videobuf2

配置好,Save之后,编译。

1
make -j8

然后把生成的固件刷机。不会的话参照WRTnode 2R SDK搭建,固件的编译后部分。

刷好之后,插上USB摄像头,ls /dev看看是否已连接上。结果并没有连上。

查看内核日志发现是电流不够

1
usb 1-1.3: rejected 1 configuration due to insufficient available bus power

其实内核日志也可以这样查看:

1
dmesg | grep usb

经过google查到解决方法执行下面的命令:

1
echo 1 > /sys/bus/usb/devices/1-1.3/bConfigurationValue

bConfigurationValue的意思大概是强制启用该USB设备。 这里的1-1.3改为你的内核日志里的USB端口号,然后再ls /dev发现USB摄像头挂载成功,也就是绿色框内的video设备。

再次查看内核日志,已经有摄像头成功加载的信息。

然后我们就可以使用mjpg_streamer 来推流了。

1
mjpg_streamer -i "input_uvc.so -f 25 -r 640*480" -o "output_http.so -p 8080"

不出意外的话,打开这个网址就可以看到摄像头的图像了。http://192.168.8.1:8080/?action=stream

如果你想每次启动WRTnode 2R之后,都会自动开启摄像头传输视频,可以在系统选项卡下的启动项设置的本地启动脚本中加入上面那些命令。

1
2
echo 1 > /sys/bus/usb/devices/1-1.3/bConfigurationValue
mjpg_streamer -i "input_uvc.so -f 25 -r 640*480" -o "output_http.so -p 8080"

首先,我们需要完成WRTnode 2R SDK搭建,固件的编译,然后我们可以在wrtnode文件夹下找到mipsel-openwrt-linux-gcc,将其软链接到/usr/local/bin目录下。

1
sudo ln -s /home/ypw/Desktop/wrtnode/staging_dir/toolchain-mipsel_24kec+dsp_gcc-4.8-linaro_uClibc-0.9.33.2/bin/mipsel-openwrt-linux-gcc /usr/local/bin/

然后我们新建一个工作目录,创建test.c,然后进行交叉编译。

1
2
3
mkdir test
cd test
nano test.c
1
2
3
4
5
6
#include <stdio.h>
int main()
{
printf("Hell World!\n");
return 0;
}

Ctrl+O,回车,保存文件,然后Ctrl+X退出nano。

1
2
mipsel-openwrt-linux-gcc test.c -o test
scp test root@192.168.8.1:/root/

编译完成之后,我们通过scp命令将其拷贝到WRTnode 2R上。

最后,在2R上运行test。

1
2
ssh root@192.168.8.1
./test

参考自用openwrt编译器交叉编译

首先当然是安装ubuntu啦,我这里安装的是ubuntukylin-14.04.2-desktop-amd64.iso。

然后我们需要下载WRTnode的SDK,来自WRTnode2R内测版开箱指南,静态OpenWrt SDK,链接:http://pan.baidu.com/s/1hqya6H2 密码:1kz6。

注意:如果你需要安装更多功能,比如opencv,python等,那么你可能需要下载许多源码包,有一些会非常费时间,因此我将我这里已经下载好的包上传到了博客,大家可以下载好以后直接放在wrtnode目录下,减少编译所消耗的不必要时间。链接: http://pan.baidu.com/s/1c06YdH2 密码: dfns 下载好之后,可以直接在ubuntu中打开,然后解压到桌面上。这里需要注意的一点是,如果你的ubuntu选择了中文,桌面文件夹是中文的“桌面”,而不是Desktop,那么你就需要换一个地方放你的SDK,因为Subversion不支持中文路径。如果习惯于使用终端操作,可以使用tar解压。

1
2
tar -jxvf sdk.tar.bz2
cd wrtnode

然后我们可以打开终端,开始配置环境。

1
2
3
sudo apt-get update
sudo apt-get -y upgrade
sudo apt-get -y install build-essential subversion libncurses5-dev zlib1g-dev gawk gcc-multilib flex git-core gettext libssl-dev

配置好以后就可以进入wrtnode目录,进行相关配置,然后开始编译。这里需要注意的是,WRTnode 2R的CPU型号是MT7688,因此我们应该在Subtarget (MT7628 based boards)中选择MT7628 based boards,不然烧进去就会变砖

1
2
3
cd Desktop/wrtnode
make menuconfig
make V=s

这个过程十分漫长,时间通常在半个小时到两个小时左右,第一次编译完成之后,之后的编译将会十分迅速。如果嫌编译速度慢,可以使用-j参数提高编译速度。

1
make -j8

编译完成以后,固件的路径是wrtnode/bin/ramips/openwrt-ramips-mt7628-wrtnode2r-squashfs-sysupgrade.bin。

得到bin文件之后,可以进入http://192.168.8.1开始刷机,选择系统,备份/升级,在刷写新的固件选项卡下选择刚才编译的文件,然后点击刷写固件。这个过程可能有五分钟,可以耐心等待,但是不可以断电。

安装:

1
2
3
sudo add-apt-repository ppa:webupd8team/sublime-text-2
sudo apt-get update
sudo apt-get install sublime-text

包管理器: https://packagecontrol.io/installation#st2

Build System:

在OS X 中使用Sublime Text编译和运行C/C++。

1
2
3
4
5
6
7
8
9
10
11
12
13
14
15
{
"cmd": ["bash", "-c", "g++ '${file}' -o '${file_path}/${file_base_name}' && osascript -e 'tell application \"Terminal\" to activate do script \"clear&&cd \\\"${file_path}\\\"&&\\\"${file_path}/${file_base_name}\\\" && echo \\\"Finished \\\"${file_base_name} &&exit\"'"],
"file_regex": "^(..[^:]*):([0-9]+):?([0-9]+)?:? (.*)$",
"working_dir": "${file_path}",
"selector": "source.c, source.c++",

"variants":
[
{
"name": "Run",
"cmd": ["bash", "-c", "g++ '${file}' -o '${file_path}/${file_base_name}' && '${file_path}/${file_base_name}'"]
}
]
}

iTerm运行C/C++程序:
1
2
3
4
5
6
7
8
9
10
11
12
13
14
{
"cmd": ["bash", "-c", "g++ '${file}' -o '${file_path}/${file_base_name}' && osascript -e 'tell app \"iTerm\"' -e 'set newWindow to (create window with default profile command \"/bin/zsh\")' -e 'tell current session of current window' -e 'write text \"clear && cd \\\"${file_path}\\\"&&\\\"${file_path}/${file_base_name}\\\" && echo \\\"Finished \\\"${file_base_name}\"' -e 'end tell' -e 'end tell'"],
"file_regex": "^(..[^:]*):([0-9]+):?([0-9]+)?:? (.*)$",
"working_dir": "${file_path}",
"selector": "source.c, source.c++, source.cpp",

"variants":
[
{
"name": "Run",
"cmd": ["bash", "-c", "g++ '${file}' -o '${file_path}/${file_base_name}' && '${file_path}/${file_base_name}'"]
}
]
}

1
2
3
4
5
6
7
8
9
10
11
12
13
14
15
16
17
18
19
20
21
22
23
24
25
26
27
28
29
30
31
32
33
34
35
36
37
38
39
40
41
42
43
44
45
46
47
48
49
50
51
52
53
54
55

# coding: utf-8
__author__ = 'Administrator'
import os

fileall = open("libraryall.txt", 'r')
fileall.seek(-10000, os.SEEK_END)
text = ""

def getfilename(myurl):
return myurl[myurl.rindex('/')+1:]

lines = fileall.readlines()

i = 0
while True:
while True:
text = lines[i]
if text.find("http://libopac.btbu.edu.cn") >= 0:
break # 循环找到起点,网址
i += 1
if i >= len(lines):
break
if i >= len(lines):
break
link = text.strip()
bookid = getfilename(text).strip()
i += 1
name = lines[i].strip() # 下一行是书名
i += 1
detail = ""
while True:
detail += lines[i]
i += 1
if len(lines[i]) <= 2:
break
detail = detail.strip()
i += 1
guancang = lines[i].strip()
guancang = guancang.replace("false", "False")
guancang = guancang.replace("true", "True")
print link, bookid, name, detail, guancang
try:
exec("guancang = "+guancang)
for item in guancang:
print "-----------"
for item2 in item:
if (item2 == '索书号') | (item2 == '条形码') | (item2 == '部门名称') | (item2 == '备注'):
print item2, item[item2]
except:
pass
print "\n"
i += 1


0%